DirecTV Dish Installation Project
(This was originally an e-mail message sent to family and some friends on December 2, 2006. For some reason, this e-mail message turned into a novel, and was so much fun to write that I just kept going and then also decided to save it off on the web.)
This story is a great example of how a stubborn perfectionist can spend ridiculous amounts of time, money, and energy attacking a problem (that might or might not have a simpler solution; I'll yet you be the judge).
For your viewing and reading pleasure, here is the "annotated photos" version of the entire saga.
The Initial Plan;
This is Going to Be Easy
So, it's back in March (I think, sometime around then anyway) shortly after we moved in, and there's already a DirecTV dish (left by the previous owner) on the top of the driveway. But this isn't a real man's, HD-locals-ready, it's-the-latest-thing-in-satellite-TV satellite dish, it's just an old single LNB round dish. It just won't do. So when I call DirecTV, they assure me that they'll have the installer install a new 5 LNB dish and provide us with three new H20 STBs (receivers). I'm happy. DirecTV seems to go out of their way on customer retention (this was all at no installation cost, BTW).
Oh yeah... and here's where the dish went. Due to the fact that it's bigger than the old one, it needed a new 2-inch mast, which the installer sank in concrete next to the old one. (This photo was the only one I could find quickly that showed the dish from the viewing perspective of the house; ignore the tree service truck!)
Problem #1
Only two buried coax cables were available from the dish to the house; this latest generation AT-9 dish should really have four. And, as you can see, it's a really long run and needs to cross the driveway (the only reasonable path is under the driveway and across the front yard, for reasons I won't get into). So, for now, the installer is only going to be able to leave two receivers. Well, that's no big deal, we can live with that for awhile.
Problem #2
Uh oh. Only one of the coax cables works; the other is broken somewhere. And we can't find the break. And the receivers are already installed.
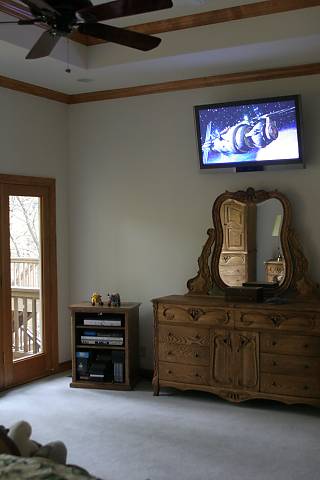
So — clever guy that I am — I tell the installer that I'll take care of burying new cables later; just leave the two receivers and I'll swap connections in the basement when we need to watch one TV (bedroom) or the other (hearth room near the kitchen).
Time Passes, Plan
"A" is Hatched
Day after day, week after week, I'm popping down to the basement to switch cabling around. Takes all of a minute or two, but a hassle nevertheless.
But! ... a plan starts forming.
You know, I think I'll be really forward-thinking and bury a conduit from the top of the driveway to the house (about 170 ft.). Based on my research on the forums where the "ham radio antenna and satellite dish guys" hang out, that was the thing to do when facing a cabling challenge like this. Run some continuous PE conduit (seamless, continuous plastic pipe), put in a pull cord, and you're future-proofed! Pull more cable, replace cable, whatever, whenever you want. Sky's the limit.
Procurement and
Other Preparation for Plan "A"
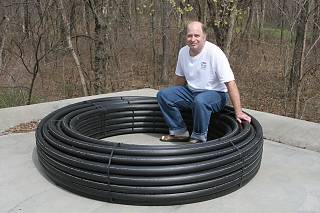 So... I get a big 500
ft. coil of 2" I.D. PE pipe (photo on right), which weighs in at
over 300 lbs. and probably about 7 or 8 ft. in diameter (anything less, of
course, wouldn't cut it, right?). This in itself was a major undertaking,
because for some reason (!), it seems that pipe like this isn't usually sold to
regular consumers. But you can get it at Industrial Sales in
Olathe. And getting it home, of course, involved borrowing my parent's
trailer.
So... I get a big 500
ft. coil of 2" I.D. PE pipe (photo on right), which weighs in at
over 300 lbs. and probably about 7 or 8 ft. in diameter (anything less, of
course, wouldn't cut it, right?). This in itself was a major undertaking,
because for some reason (!), it seems that pipe like this isn't usually sold to
regular consumers. But you can get it at Industrial Sales in
Olathe. And getting it home, of course, involved borrowing my parent's
trailer.
I order (mostly off eBay) all the stuff I need to for the cabling itself: a nice 1000 ft. spool of direct-burial RG-11 coax (none of that wimpy RG-6 stuff for me), plenty of compression connectors (none of that cheap hex crimp stuff for me), and the connector compression tool. Oh yeah, and I pick up locally various cable pulling supplies (nylon pull cord, cable pulling sleeves, and lubricant).
Oh, I'm almost forgetting the best part. How can I get across (or under) the driveway? With a boring tool, of course! The Borit BM560-1450Y boring kit, to be precise. That, and a few 4 ft. sections of threaded steel pipe I pick up at the hardware store.
Execution of Plan
"A"; Disillusionment
I'm dreading actually executing Plan "A", because the trenching looks like it is going to be both risky and a lot of work. And I'm starting to suspect that uncoiling that massive plastic pipe and actually getting it successfully laid into a trench may not be so easy. And there's the threat of cutting into something. I had already called the Kansas "dig safe" service and had them send someone out to put up the marker flags. That gives me a couple of weeks or so to do the trenching.
So... after procrastinating on this for quite awhile, I (with some help from Helen) finally build up some courage and it's finally Trenching Day! A nice, sunny Saturday. Yippee!
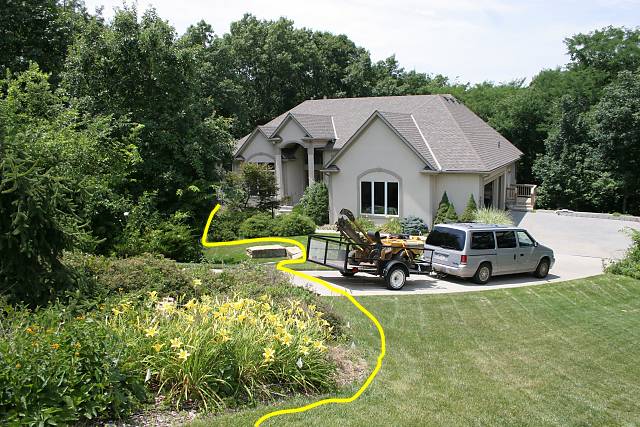
I go to United Rentals (way down in Belton, because I couldn't find what I needed any closer) and get the trencher. Damn, it's big!
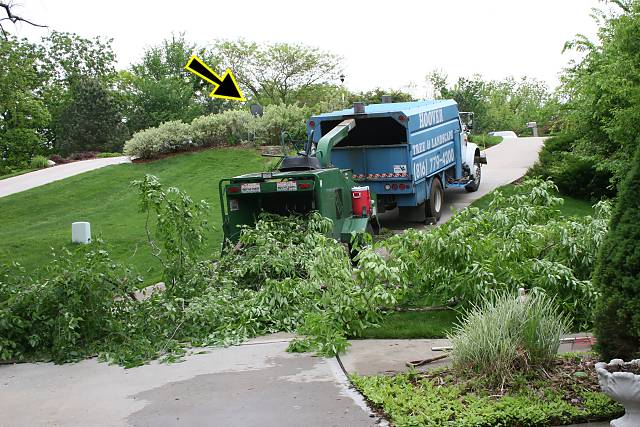
So here's the trencher, along with the planned trench route:
I start trenching. This thing does serious earth removal. It's not exactly precision trenching. In fact, it's ripping the hell out of the yard. And I'm hitting lots of rocks. I don't like this, and Dad (who was nice enough to come up here to help) isn't exactly providing the optimistic encouragement I need (his role became "reluctant assistant").
After maybe an hour or so, the trench extends from the dish to the driveway. Lunch break. I feel dejected. Helen and Dad are casting those "do you really know what the hell you're doing" glances my way. In fact, of course I know what the hell I'm doing. It's obvious. I'm ripping up the yard, hitting lots of rocks, and generally causing mass destruction. And the best was yet to come: crossing the part of the yard with sprinkler system pipes in unknown locations. (And boring under the driveway, and actually laying in the pipe, and...)
Time to swallow my pride and do the smart thing: admit defeat and quit. So I do. Helen and Dad, I suspect, are happy (that I saw the light).
However ... during that long restless night and Sunday that followed, despair starts ... to ... mutate ... into ... Plan "B".
(I won't bore you with the details of the wonderful experience of getting the 900+ lb. trencher back on the trailer — in the pouring rain — on Monday morning before work. My life flashed before me.)
Plan "B"
OK, Plan "A", although a truly magnificent plan and masterfully executed, just didn't work out.
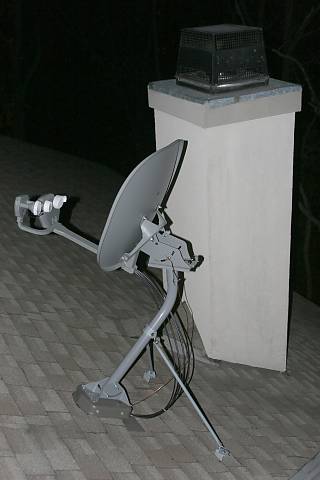
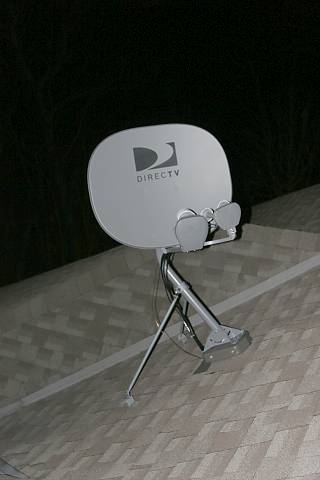
Despite the fact that much of the on-line advice I'm reading says to avoid mounting the big 5 LNB AT-9 dish on a roof, my thoughts are, of course, "I think I'll mount the dish on the roof". Because — what it boils down to — is that our property has some serious lines-of-sight-to-the-satellites problems (at least without cutting down trees) that pretty much preclude the usually-preferred "dish on a post close to the house" solution.
More research reveals that this can be done, but requires additional support struts (beyond the simple J-mount mast). I also discover the Commdeck roof mounting system; it allows all fastening to be done under the shingles and offers a nice, clean, leak-proof solution and allows cabling to pass through the roof into the attic.
 Of course, putting
the dish on the roof introduces some new problems:
Of course, putting
the dish on the roof introduces some new problems:
- The
dish will have to be properly aligned. And these 5 LNB dishes cannot
be aligned as easily as the old ones. You need special
equipment. So, off to do some Internet shopping again. This
time, for a Suunto Tandem compass/clinometer and a Perfect 10 AccuTrac
22 Pro satellite signal strength meter.
- Figuring
out how to get cables from the attic to the basement (the "home
run" location for all house cabling).
So... Plan "B" is basically:
 do a site survey of the roof and find an acceptable
location for the dish (that's where the compass/clinometer come in)
do a site survey of the roof and find an acceptable
location for the dish (that's where the compass/clinometer come in)- run four
RG-11 coax cables and one 8 ga. bare copper ground wire run from the
basement to the attic
- uninstall
the dish from its existing location near the street
- install
the dish on the roof
- align
the dish (that's where the AccuTrac 22 Pro comes in)
Executing Plan
"B"
As with Plan "A", it takes awhile to build up enough enthusiasm to actually start the job, although this plan looks much more promising and I actually can't see any real obstacles to success.
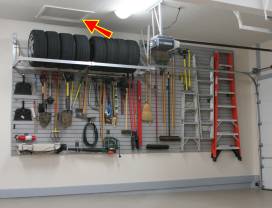 It doesn't help that
months earlier, I had somewhat blocked access to the attic when I completed the
garage improvement project; the access to the attic now involves temporarily removing some
tires stored on a rack below the entrance hole.
It doesn't help that
months earlier, I had somewhat blocked access to the attic when I completed the
garage improvement project; the access to the attic now involves temporarily removing some
tires stored on a rack below the entrance hole.
Getting onto and working on the roof isn't too much fun, either. I finally discover that an 8 ft. stepladder on the deck on the rear of the house provides access. After awhile, I'm building up enough confidence that working on the 30-degree-slope part of the roof doesn't seem that risky anymore.
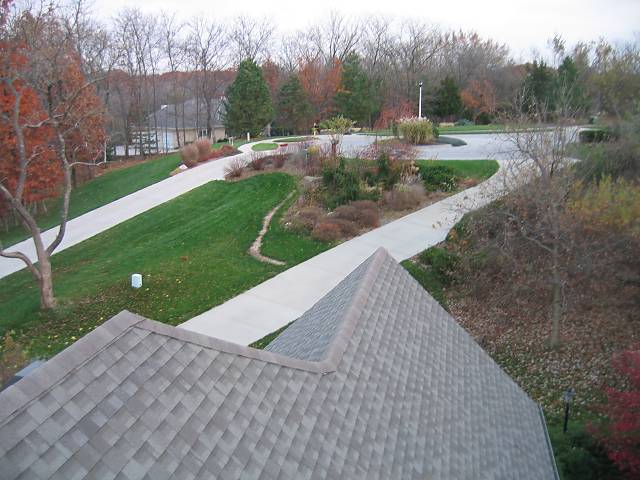
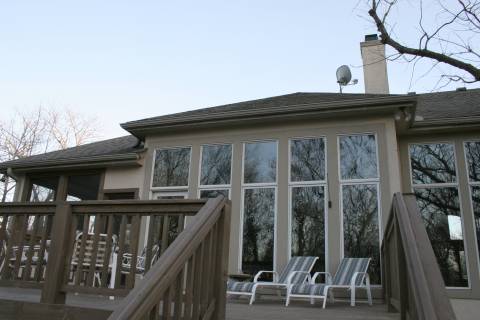
My site survey on the roof reveals that a location on the back of the house near the chimney will work. And by placing the dish about halfway down the roof, it won't be visible from the street or anywhere on the front side of the house.
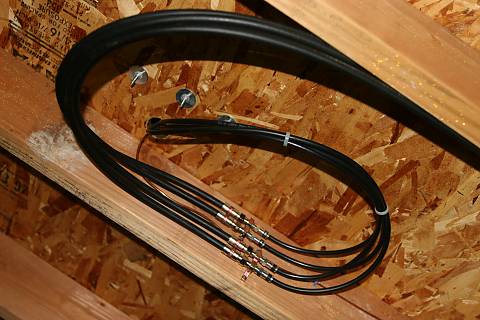
With a dish location established, it's time to assure that it really is possible to get cabling from the attic to the basement. Finding that path turns out to be quite a challenge. I finally find one and get a pull cord run from the attic to the basement. Pulling cable takes another few hours — spread across a few days.
With the cabling intact, it's time to get back on the roof and install the dish.
From the roof, I can see the dish in its current location near the street, along with the part of the front yard that I scarred with the trencher months earlier!
The next step is to peel back some shingles and install the base half (which includes the flashing) of the Commdeck. This is pretty much a "follow included instructions" thing; it goes off without a hitch. Cutting shingles and drilling holes in the sheathing is a little stressful at first, but once you see how it works, it's not bad.
A little bit later, I have the top half of the Commdeck (with the J-mount mast already bolted to it) attached to the bottom half; note that the support struts are just laying there, not attached yet. Helen's on a landing on the stairs on the deck, talking on the phone, ready to catch me when I fall, I'm sure. Note that I'm using a trick I learned from a roofer we had out here a few months ago: big pieces of foam rubber make handy, sticky surfaces to leave tools on and to sit on.

I work slowly and carefully for a few more hours — spread across a few days again — of installation tasks: installing the strut arms, pulling the last segment of cable, etc. Eventually, I haul up the rather large (25 lbs. or so) AT-9 dish and attach it to the mast. Alignment turns out to be really easy, since I'm armed with the right signal meter.
Finally, the job is done. It's incredibly satisfying to just connect the satellite dish feed cables to the cables leading to the receivers upstairs (I'll set up a nice patch panel later) in the basement and then having those receivers just work. And the signal strength reported by the receivers is higher than it was before I moved the dish!
Success At Last!
Some installation "beauty shots", taken late evening (had to use the flash because it was so dark):
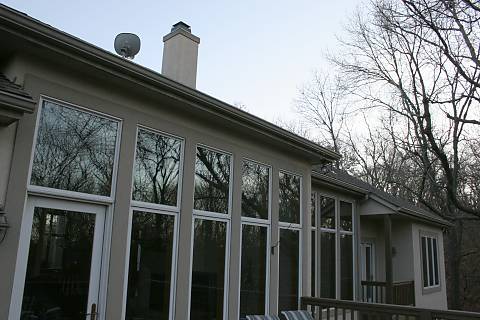
Closer in, showing how the Commdeck provides an "all penetrations under the shingles" solution:

You can barely see the dish from the deck, and only if you stand way back:
It's a little more visible from the landing on the stairs from the deck to the patio:
Underneath the dish, showing the wiring in the attic as well as some of the Commdeck fasteners (the main fasteners were into the rafters):
So... we're finally able to watch TV and record programs using multiple receivers. Without running to the basement to change cabling!
Final Thoughts
 Was it worth it? Probably.
Biggest mistake was not going with the roof mount in the first place.
That would have saved tons of time, materials, and hassle.
Was it worth it? Probably.
Biggest mistake was not going with the roof mount in the first place.
That would have saved tons of time, materials, and hassle.
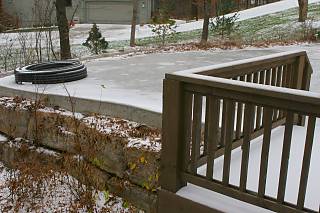
Coiley is still sitting at the end of our driveway to this day (see photo on right). [25-May-2007 edit: Coiley was sold via eBay in April, 2007 to a nice chap from Iowa. He'll probably be writing a story similar to this one in a year or so...]
One thing I'm sure of, though, is that there is no way that a DirecTV-contracted installer would have ever spent the time on the roof mount to do it right and get the cables run properly, etc. Especially considering that we've got some fairly unique challenges here, like the synthetic stucco that we don't want to disturb or penetrate with things like cables, ground wires, etc. I'm actually very happy that I didn't have the installer try to do a roof mount in the first place; it almost certainly wouldn't have turned out well. Heck, I even caught the installer's mistake of attaching a grounding wire for the coax grounding block to our natural gas line (which he evidently mistook for a water pipe)!
There are other lessons here, too, like: when building a house, get it pre-wired as much as possible! And leave some nice conduits with pull cords in a few locations, like from the attic to the basement!
--
Ed